
Recording Vocals at Home: Cheap Fixes for Pro Sound (No Studio Needed)
Capturing great vocals at home is challenging, but you don't need expensive gear. Learn essential techniques for room treatment, mic placement, and noise reduction that truly work on a budget.
Your voice is your most powerful instrument, and capturing its raw power and nuance at home doesn't require a million-dollar studio – just smart choices and a few cheap tricks. Forget the myth that you need specialized acoustic panels or a vintage tube mic to get a professional-sounding vocal take. The truth is, the biggest improvements come from understanding your space and your technique.
Many independent artists get frustrated with muddy, boomy, or echoey vocal recordings, but these are almost always symptoms of the environment, not a lack of expensive equipment. We're going to break down the most impactful, budget-friendly ways to transform your home vocal recordings from demo quality to radio-ready.
Taming the Room: Budget Acoustic Hacks
The single biggest hurdle for home vocalists is the room itself. Untreated rooms are full of hard, reflective surfaces (walls, ceilings, windows, bare floors) that bounce sound around, creating unwanted reverb, flutter echo, and a generally unprofessional sound. You can have the best microphone in the world, but if it’s picking up the sound of your bathroom, it will always sound like your bathroom.
As The Artist Developer always says, "Your room is 90% of your sound before the microphone even hears you. You can have the fanciest mic, but if you're recording in an echo chamber, it'll sound like you're singing in a cave."
Here’s how to fight back:
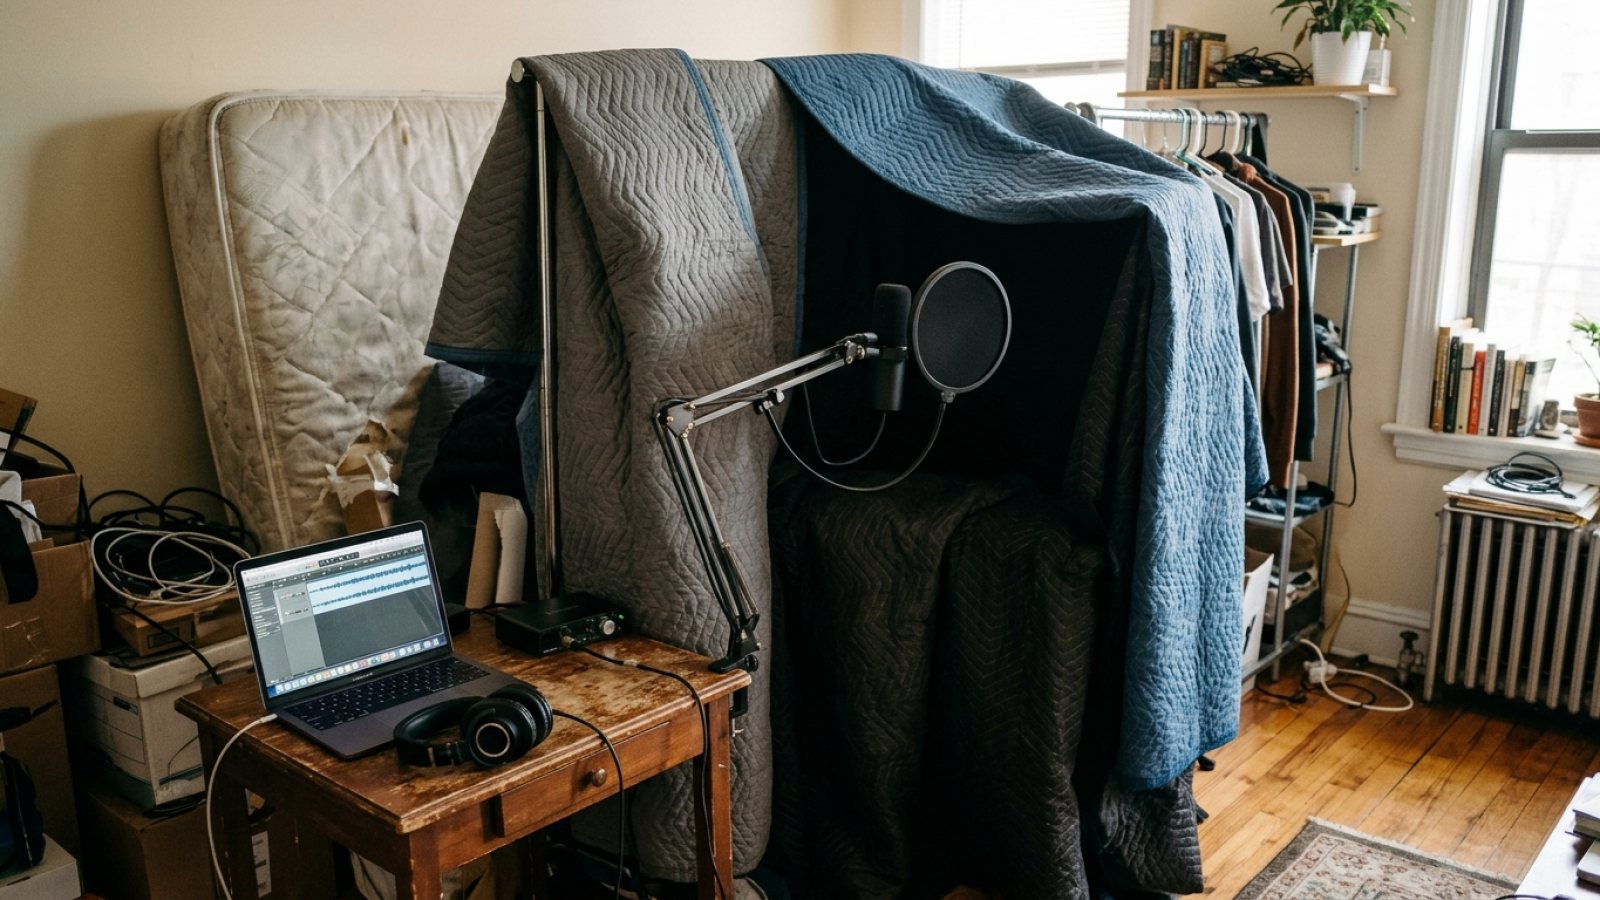
- Blanket Fort Engineering: The simplest, most effective fix. Drape thick blankets, duvets, or moving blankets over microphone stands, clothes racks, or even furniture behind and to the sides of where you're singing. The goal is to absorb those early reflections. A heavy duvet hung over a door frame can create an instant, if temporary, vocal booth.
- Closet Commander: A walk-in closet full of clothes is an acoustic treat. The clothes act as natural diffusers and absorbers. Step inside, close the door (just enough to block external noise), and sing. It’s an instant, free vocal booth.
- Mattress Magic: Stand a spare mattress upright behind you, or angle two against a corner to create a dead zone. Mattresses are excellent, dense absorbers.
- Strategic Furniture Placement: Heavy bookshelves, couches, and curtains all help break up reflections. Don't be afraid to rearrange your recording space temporarily. Record in a corner, with blankets forming a triangle around you and the mic.
The key is to create a small, dead space around your microphone and vocal performance, minimizing direct reflections back into the mic.
Mic Technique Mastery: Your Voice, Your Control
Once your room is as treated as possible, your microphone technique becomes paramount. Even with a basic dynamic microphone (like a Shure SM58 type) or an affordable condenser mic, proper technique makes a world of difference.
- The Pop Filter is Not Optional: This is a cheap, indispensable piece of gear. It sits between you and the microphone, preventing harsh "p" and "b" sounds (plosives) from overloading the capsule. It also helps maintain consistent distance.
- Distance Matters: For most vocals, a distance of 6-12 inches (15-30 cm) from the microphone is a good starting point. Too close, and you get an exaggerated low-end (proximity effect) and potential distortion. Too far, and you pick up more of the room and less of your direct vocal sound. Experiment to find the sweet spot for your voice and mic.
- Off-Axis Singing: Instead of singing directly into the microphone, try singing slightly off to the side, or aiming your voice just above or below the capsule. This can reduce sibilance (harsh "s" sounds) and some plosives, while still capturing your vocal clarity.
- Listen on Headphones: Always monitor your performance through headphones. This lets you hear exactly what the microphone is capturing, including any subtle room noise or issues with your technique. Don't rely on your room speakers for monitoring while tracking vocals.
Beyond the Booth: Noise, Software, and Performance
Even with a treated room and great mic technique, external factors can sabotage a take. Think about these often-overlooked elements:
- Silence is Golden: Record when your environment is quietest. Turn off air conditioners, refrigerators, fans, and anything else that generates ambient noise. Choose a time when traffic is low or neighbors are quiet. Computer fan noise can also be an issue – if possible, get your computer out of the recording room and use long cables for your monitor and interface.
- Headphone Bleed: If your headphones are too loud, the sound from them can bleed into your microphone. Keep monitoring levels reasonable, especially if you're using open-back headphones.
- Minimal Processing on the Way In: While some interfaces offer onboard compression, it’s often best to record as clean as possible. You can add EQ, compression, and reverb later in your Digital Audio Workstation (DAW) like Ableton Live, Logic Pro, or GarageBand. The Artist Developer often reminds artists, "Don't try to fix a bad recording with plugins; fix the source. EQ and compression are season finishers, not miracle workers."
- Performance is King: No amount of acoustic treatment or mic technique can save a lacklustre performance. Do multiple takes, focus on emotion and consistency. The best take, even if imperfect, will always be the one with the most feeling.
Recording great vocals at home is an art, not just a science. By focusing on your environment with cheap fixes, mastering your mic technique, and being mindful of external noise, you can elevate your sound dramatically. Experiment with these tips today, and you’ll be amazed at the professional-grade results you can achieve without breaking the bank.
